

How to Create Forms Super Easily with OMICall
Reading time: 5 minutes
OMICall provides an easy-to-use form creation tool that helps businesses efficiently collect customer information. This article explains how to create professional forms for conducting surveys and gathering data. Explore and leverage this feature to optimize business processes and enhance the customer experience.
What are OMICall forms?
Forms are effective tools that enable businesses to interact directly with customers. By filling out a form, customers can provide necessary, specific information. Data collected via forms not only assists businesses in conducting surveys and gathering information but also triggers OMIFlow automation processes. Consequently, businesses can improve service quality, enhance the customer experience, and optimize business operations.
General form configuration
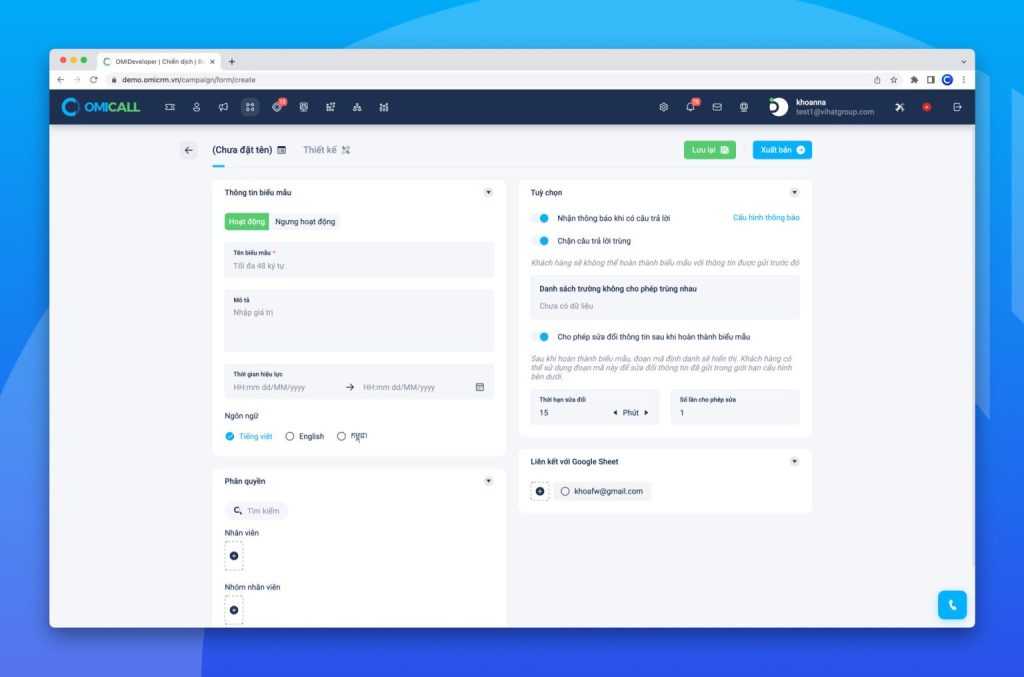
General Form Configuration
Validity Period
This form can only be completed by customers within a specified timeframe. If no time limit is set, the form remains available for completion at any time.
Receive Notifications for Responses
The staff member who created the form will receive a notification as soon as a customer completes and submits it.
Prevent Duplicate Responses
The system checks for and prevents duplicate responses based on the customer’s submission history.
Allow Information Modification After Submission
Upon submission, the system generates a unique response ID. Customers can use this ID to modify their responses, subject to limits on the number of edits or the time allowed.
Google Sheets Integration
The form can be linked to a Google account, enabling automatic data transfer to an existing spreadsheet or the creation of a new one.
Access Permissions
Authorized staff members or teams can view and manage the form from the list view.
Creating and Configuring Forms on OMICall
Start Creating a Form
Access the Forms feature via the icon in the menu bar, then select the “Forms” tab.
Form Interface
Click the “Add Data Field” button to add fields to the form.
This is the form interface displayed after you initiate the form creation process.
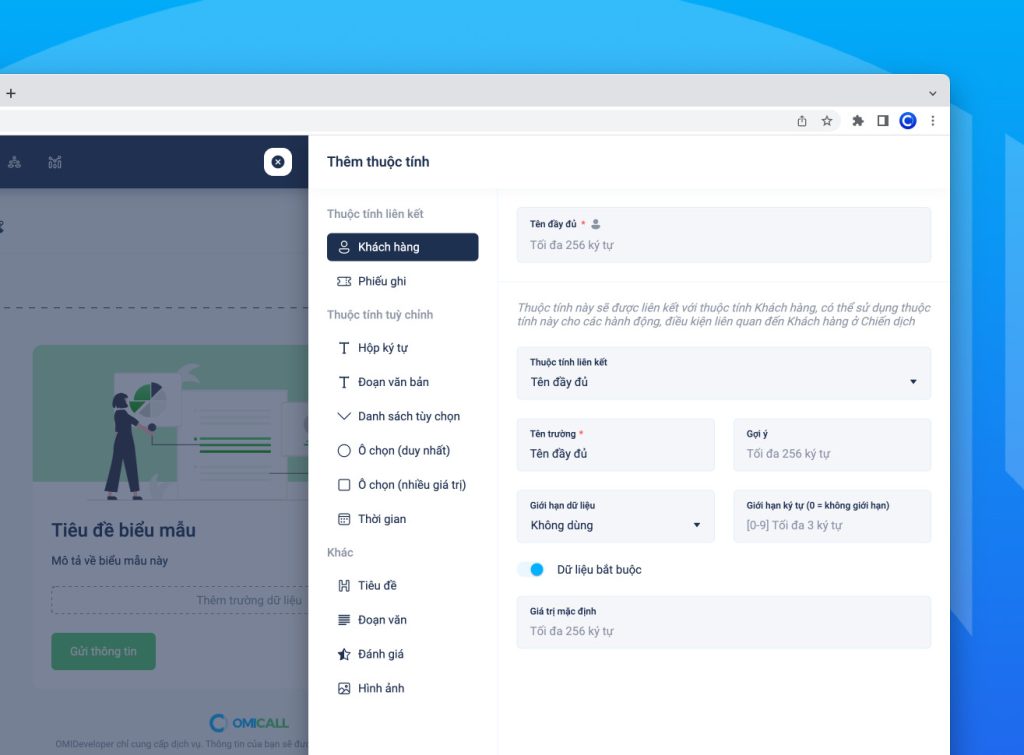
Form Interface
Further explanation of attributes:
Linked attributes
Linked attributes are those that connect directly to the system’s data fields—such as customer information or ticket details. These attributes hold values that correspond to existing customer or ticket attributes within the business system.
Linked attributes are used in campaigns, allowing for the comparison or direct substitution of values entered by customers into the form. These values then link directly to the business’s customer or ticket records.
Example: A form contains two linked customer attributes: “Full Name” and “Phone Number.” When this form is used in a campaign with the “Add Customer” action, the system automatically adds a new customer using the linked attribute values entered into the form.
Custom attributes and other attributes
Businesses can configure custom attributes for purposes such as conducting surveys, gathering in-depth information, or executing marketing and customer care campaigns, ensuring that all collected data is relevant and useful for their business objectives.

Vietnam’s leading AI-powered multi-channel virtual call center solution
Interface after form completion
Once the form is completed, users can customize the interface with illustrative images and content tailored to their business needs.
Updating and publishing the form
Use the “Update” button to save the form as a draft. Use the “Publish” button to make the form live; end customers will then see the published version of the form.
Form responses and statistics
Access the “Reports” tab to view customer responses and analytical data.
Select the “Responses” tab to view the history of customer responses, and the “Form Analysis” tab to view responses in a statistical format.
For text-input fields, the system provides statistics based on keywords.
For selection fields, the system provides analysis in the form of a pie chart.
Sharing the form with customers
To allow customers to complete the form, simply copy the form link and send it to them. Customers can access this link to enter their information.
Additionally, you can embed the form directly into your website using an HTML snippet. For more details and specific instructions, please visit the “Embed Form” tab in the management interface.
Conclusion
This guide has explained how to create a form on OMICall and detailed the various form components. We hope businesses can utilize this feature to create forms that support their business operations.
For further information, please contact:
VIHAT TECHNOLOGY Co., Ltd
Headquarters: ViHAT Building – 06 Street No. 16 (Him Lam Residential Area) – Hiep Binh Chanh Ward – Thu Duc District – Ho Chi Minh City
Hanoi Branch: Floor 15, LADECO Building, 266 Doi Can, Ba Dinh, Hanoi
Cambodia Branch: Thida Rath #154 St. 33MC, Sangkat Steung Meanchey, Khan Mean Chey, Phnom Penh

-
 What is TikTok advertising? Advertising policies and how it works.
-
 Exploring Conceptual Selling – Understanding Modern Sales Trends Correctly
-
 What is a KOC? Distinguishing between KOLs and KOCs.
-
 What Are Customer Insights? Revealing How to Effectively Uncover Them
-
 What is Digital Marketing? 10 Effective Forms of Digital Marketing
-
 What is Online Marketing? Types of Online Marketing